
Looking for a way to create a click-to-subscribe link and collect push notification subscribers?
We get it. Sometimes it’s much more convenient to have a little flexibility with the way in which you grow your subscribers.
Don’t worry. We have you covered.
In this article, we’re going to show you step-by-step how to create your own subscribe button or link.
We’re going to use PushEngage to show you how to do it.
But don’t worry even if you’re using a different vendor. The process should be fairly similar. But if you’re serious about growing your subscribers, you should try PushEngage. PushEngage is the #1 push notification software in the world.
So, if you haven’t already, get started with PushEngage today.
Ready? Let’s dive in.
How to Create a Click-to-Subscribe Button Using PushEngage
If you haven’t set up PushEngage yet, this is a good time to go ahead and do it.
Step #1: Get Started With PushEngage
Head over to the PushEngage home page and click the Get Started button:

Then, you’ll want to select the free plan to try out PushEngage or choose a paid plan if you’re serious about growing your business. The paid plans come with more campaign options and the ability to build even bigger subscriber lists.
Step #2: Copy the Snippet
In your PushEngage dashboard, head over to Site Settings » Site Details and click the Click Here for Setup Instructions button. Under Any Site, you’ll get your installation code:

WARNING: You need to copy the code you get from your dashboard. The code is unique for each PushEngage user. You won’t be able to copy the code in the image and collect push notification subscribers.
Once you have the code in your PushEngage dashboard, add this snippet to your code:
<script> window._peq = window._peq || [];</script>Your final code should look something like this:
<script src="https://clientcdn.pushengage.com/core/02a6e92667ae2279fcba8932356c1d93.js" async></script>
<script> window._peq = window._peq || [];</script>
Step #3: Create a Button Or Link
How to Create a Subscribe-On-Click Button in HTML
Now that you have the code, most of the hard part is done. Now, you’ll have to create a button that triggers your code when it’s clicked. This is what we call an ‘onclick event’.
To create a subscribe-on-click button, use this HTML snippet:
<button onclick="subscribeOnClickButton()">Subscribe</button>A subscribe button can be great as an above-the-fold call to action.
Here’s what that would look like without any styling:
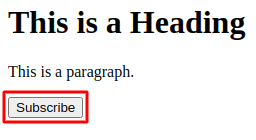
Ignore the heading and paragraph in the screenshot. It’s just to show you what it might look like on a website’s first fold. The HTML snippet won’t generate the heading and the paragraph.
Of course, you should style your button using CSS once you paste in the code. If you don’t know how to style HTML elements, here’s a nice list of examples you can look at.
How to Create a Subscribe-On-Click Link in HTML
You could also collect your subscribers using a subscribe link. In that case, here’s the HTML snippet:
<a onclick="subscribeOnClickButton();" href="javascript:void(0)">Subscribe</a>This is for when you create an in-text hyperlink. This can be very handy if you’d like to slip in a push notification subscription pitch in your blog posts.
It should look something like this:
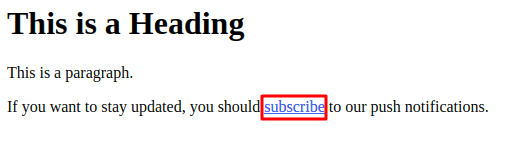
Your HTML snippet will only create a link that says Subscribe. Feel free to add the rest of the content as we did in the image. That way, it will feel way more natural.
And that’s it! Your link’s ready.
Step #4: Embed the Code in WordPress
Done? Let’s get to the rest of the code, then.
Now, if you want only to collect a subscriber when the button gets clicked, paste this code:
<script>
function subscribeOnClickButton() {
window._peq.push(['subscribe']);
}
</script>
There are no fancy bells and whistles here. Just a button that collects subscribers when clicked.
But if you’d like something a little more advanced, you can log the response you get from the PushEngage server to the console as well:
function subscribeOnClickButton(){
window._peq.push(['subscribe',{}.pe,function(res){
if(res.statuscode==1)
{
// Code to return response
console.log(res);
}
}]);
}
If you want to collect subscribers when your button gets clicked and then segment those subscribers automatically, you can use this code instead:
function subscribeOnClickButton(){
window._peq.push(['subscribe','segment_name',function(res){
if(res.statuscode==1)
{
// Code to return response
console.log(res);
}
}]);
}
And you’re done. Pick whichever code snippet suits you the best and paste it into your website’s HTML code.
Now, for the button or the link to work, you’ll need to paste some more Javascript code at the bottom of your page.
If you’re running a WordPress site, then the simplest way to do it is to use a plugin. The best plugin for the job is the Insert Headers and Footers plugin. Install the plugin (it’s free) and head over to Settings » Insert Headers and Footers:
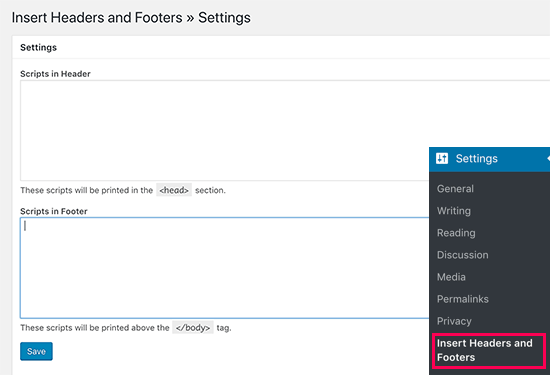
And place your full code in the Scripts in Footer box. You should be pasting in the code you got from the PushEngage dashboard as well as the Javascript code you need to run the button or link properly.
Step #5: Paste the HTML Code for the Button or Link on Your Site
Finally, you’ll need to paste the HTML code for either your button or your link on your pages and posts.
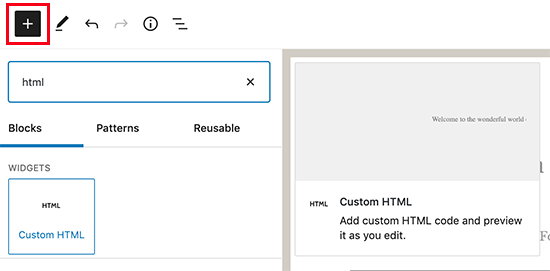
If you’re on WordPress, you can paste HTML code directly onto the article.
It’s fine if you’ve never done this before.
Here’s an article on how to add HTML code in WordPress with step-by-step instructions.
At this point, we highly recommend that you test your push notifications to check if everything’s working.
If all went well, you will have a button or a link on your site that collects subscribers when clicked. And if something isn’t working, feel free to get in touch with our Customer Success team. We’re more than happy to help.
Wrapping Up
That’s all for this one, folks!
Once you’ve created a click-on-subscribe button for your site, you should check out our advanced segmentation rules.
Creating granular segments can help you personalize your push notifications to a great extent. This means more engagement, higher clicks, and more sales from your push notification campaigns.
And if you’re new to push notifications, you should try out PushEngage. PushEngage offers some of the most powerful and flexible push notification campaigns anywhere. So, if you’re serious about growing your business, get started with PushEngage today!


Push Engage is certainly my favorite tool after trying out many out there.